

Integrating Mapbox into a Phoenix 1.7 Project - Part 2 - Receiving events in Phoenix from Mapbox


In Part 1, we explored the basic integration of Mapbox into a Phoenix project, getting the necessary libraries installed and a map displayed. In this part, we will explore passing an event, such as the user moving a marker, back to Phoenix LiveView.
Listening to Mapbox events
In our JavaScript code where we instantiate Mapbox, let's add a draggable marker to the existing map object that we want to receive events from:
// assets/js/map.js

const marker = new mapboxgl.Marker({
    draggable: true
})
    .setLngLat([139.71, 35.64])
    .addTo(map);

const markerMovedEvent = new CustomEvent(
    'marker-moved',
    {detail: marker}
);

marker.on('dragend', () => {
    const mapDiv = document.getElementById('map');
    mapDiv.dispatchEvent(markerMovedEvent);
});
We hook the marker dragend event, so that every time the user finishes moving the marker, we can do something with that information.
We create a CustomEvent and bubble our dragend event to it on the .map div. This allows us to listen to this event in other parts of our JS code.
Setting up Phoenix hooks
To allow the Javascript running in the LiveView page to send events back to Phoenix LiveView, we need to set up Hooks. Let's keep these organised into separate JS files for cleanliness.
Create app/js/hooks.js as follows as a place where we can maintain a list of hooks, and put in a placeholder for our new Map hook:
// app/js/hooks.js

import Map from './hooks/map'

let Hooks = {
    Map: Map,
}

export default Hooks;
Then create our Map hook in app/js/hooks/map.js as follows:
const Map = {
    mounted() {
        let map = document.getElementById('map');
        if (map) {
            map.addEventListener('marker-moved', (e) => {
                this.pushEvent(
                    'marker-moved',
                    { coord: e.detail.getLngLat().toArray() }
                );
            }, false);
        }
    }
}

export default Map;
On the mounted event of the page, we look to see if the .map div exists, and if so, listen for the marker-moved events set up in the previous section of this tutorial.
When a marker-moved event is received, we pass this to the Phoenix socket with this.pushEvent, including the latitude and longitude of the marker, so that we can do some processing with this information on the server.
Enabling the Phoenix Hooks
To enable the hook we've just developed, we need to ensure it's available to the Phoenix socket, and there is somewhere in the DOM to bind it.
In your assets/js/app.js, ensure the hooks are imported and added to the socket:
// assets/js/app.js

import {LiveSocket} from "phoenix_live_view"
import topbar from "../vendor/topbar"

import Hooks from "./hooks"
Modify the call to the LiveSocket constructor in the same file to ensure the imported hooks are added to it:
// assets/js/app.js

let liveSocket = new LiveSocket(
    "/live",
    Socket,
    {
        params: {_csrf_token: csrfToken},
        hooks: Hooks
    })
Finally, in the HTML where the map is added to the page, we need to add a phx-hook attribute. This can be added to any element within the page, but we add it to one of the map-related ones here:
<div id="map-container" class="h-screen" phx-hook="Map" phx-update="ignore">
  <div id="map" class="h-full"></div>
</div>
Adding the LiveView event controller
For the marker-moved event to be received in the Elixir code, we need to add an event handler. In the LiveView controller code:
# lib/my_project_web/live/map_live.ex
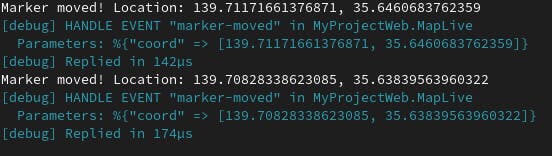
def handle_event("marker-moved", %{"coord" => [lng, lat]}, socket) do
IO.puts("Marker moved! Location: #{lng}, #{lat}")
{:noreply, socket}
end
Result!
The complete code sample can be found on GitHub.